
Hands-On Activity Guide: Copper Electrolysis
The Chemistry of Copper Electrolysis
The Copper Electrolysis Hands-On Instructional Guide can also be downloaded as a PDF, and contains additional images, a worksheet and answer guide, and a glossary. A supporting PowerPoint presentation can also be downloaded. These resources are found above
Hands-On Activity Objectives
- Apply basic chemistry principles to understand the process of electrolysis
- Understand how electrolysis is used in the processing of copper ores
Time Required
Thirty minutes to set up and up to 60 minutes to run the electrolysis.
Hands-On Activity Overview
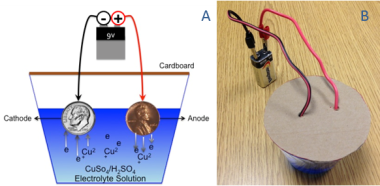
This experiment demonstrates the process of electrolysis, which is used in the commercial purification of ores such as copper sulfide ore. Electrolysis uses an electrical current to move ions in an electrolyte solution between two electrodes. In copper electrolysis, when a current is applied, positively-charged copper ions (called cations) leave the anode (positive electrode) and move toward the cathode negative electrode).
In this experiment, a U.S. penny acts as the copper source/anode and a U.S. dime serves as the cathode (a dime, versus another penny, makes the movement of copper more obvious). A dilute aqueous solution of copper sulfate and sulfuric acid is used as the electrolyte. An electric current is provided by a 9 volt (V) battery.

When electric current is supplied to the anode (penny) via the positive terminal of the battery, copper atoms are oxidized to form cations with a positive charge (Cu2+). The cations are set free in the electrolyte solution and are attracted to the cathode (dime), which is connected to the negative terminal of the battery. Additionally, the copper sulfate electrolyte solution contains copper in the form of positively-charged cations, which are also attracted to the negative electrode (the cathode, a dime).
This results in the net loss of copper from the anode (penny) and the gain of a copper coating on the cathode (dime).
copper_electrolysis_materials.jpg
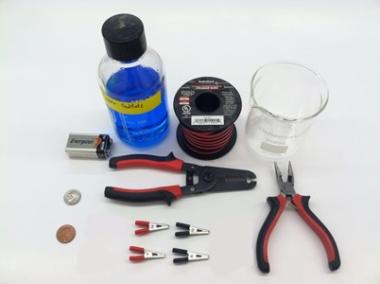
Materials (Figure 1)
- Copper sulfate electrolyte solution (200 g CuSO4· 5H2O + 25.0 mL concentrated H2SO4 solution in enough distilled or deionized water to make 1.0 L of solution)
- Coin cleaning solution (1 tsp table salt dissolved in ¼ cup vinegar)
- Pre-1982 penny (contains 95% copper, versus only 2.5% copper post-1982)
- Dime (any year)
- 9V battery (use a new 9V battery for each experiment)
- 18-gauge copper wire
- Four alligator clips (2 each of red and black)
- Wire stripper and needle-nosed pliers
- Two 250-mL beakers
- Cardboard circle (approx. 15 cm diameter)
- Precision scale (optional)
Safety Precautions
Gloves and goggles should be worn throughout this experiment. Sulfuric acid can cause burns so please handle with care. Although the power source is relatively weak, the electrodes and connecting wires should not be handled when the cell is operating. The 9V battery can become quite hot during use; use caution when handling it.
copper_electrolysis_coin_assemblies.jpg
Protocol
(Download the Copper Electrolysis Hands-On Instructional Guide (PDF) and/or Presentation (PowerPoint) for a complete set of images demonstrating materials/set-up.
copper_electrolysis_setup.jpg
copper_electrolysis_complete_setup.png
- Clean the penny with salt/vinegar mixture; rinse with water and dry (dime does not need to be cleaned).
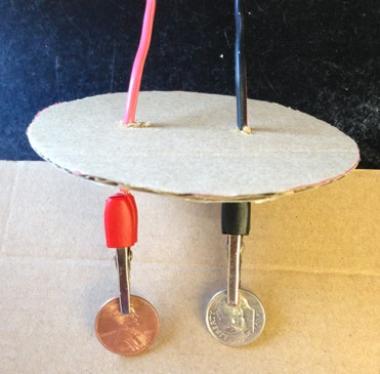
- Figure 2. Complete wire assembly: red and black wires pushed through cardboard with alligator clips attached and coins inserted.Prepare the wire assembly:
- Cut a 33 cm length of 18-gauge copper wire.
- Peel apart to separate red- and black-coated wires.
- Use 1.6 mm gauge setting on wire stripper to remove ~1.5 cm length of rubber coating from both ends of each wire to expose the copper filaments, being careful not to sever copper filaments.
- Twist filaments together tightly and fold in half.
- Make two holes in the cardboard an inch apart from each other.
- Push the red wire through one hole and the black wire through the other.
- Insert each folded end of the wires into the handle of a matching alligator clip so that the wire touches the metal inside the clip handle (red wire should have a red alligator clip at each end; black wire should have a black alligator clip at each end).
- Clip the penny into the red electrode and clip the dime into the black electrode (Figure 2). OPTIONAL step to be completed before inserting wires into cardboard: Weigh each coin/copper wire assembly (penny/red wire/red clip; dime/black wire/black clip) separately and record the mass.
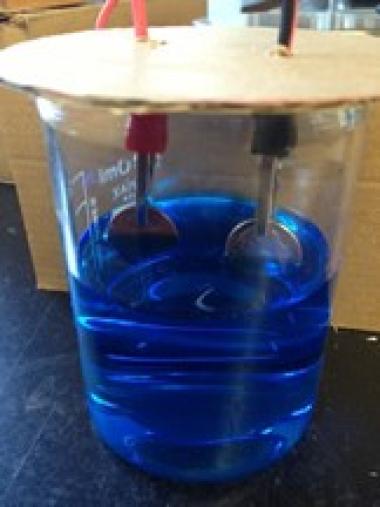
- Pour 150 mL of the copper sulfate electrolyte solution into the beaker.
- Place the wire assembly over the beaker so that the coin "electrodes" are immersed in the electrolyte solution as illustrated in Figure 3.Note: the two electrode assemblies must not touch one another.
- Clip each connecting wire to the terminals of the 9V battery: Clip the red to the positive terminal, and black to the negative terminal (Figure 4).
- Allow the electrolytic cell to operate for 30-60 minutes. OPTIONAL: Record the length of time the cell was operating.
- Remove the cardboard with the coin/copper wire assemblies and hang to dry in an empty cup or beaker until it is dry (5-10 min), being careful not to touch the coins, so as not to lose any of the copper plating.
- Examine the coins for changes. OPTIONAL: Weigh each coin/copper wire assembly and record the mass. Calculate the difference in starting and ending mass.
Disposal
Coins used in this experiment should not be reused as currency. Coin/copper wire assemblies may be discarded in the trash or recycled. Electrolyte solution can be reused; to dispose of the solution, it should be flushed down the drain with plenty of water. 9V batteries can be disposed of in the trash.
Relevance
For purifying copper commercially, large slabs of impure copper (called blister copper) are used as anodes and placed in large vat containing an electrolyte solution of copper sulfate and sulfuric acid. Thin “starter sheets” of highly pure copper foil are used as the cathodes, which are placed in between the anodes. When current is applied (over 200 amperes), copper (as well as other metals) leaves the anode and moves through the solution toward the cathode. The other metals (sometimes valuable, but considered to be impurities in copper processing) either remain in solution or fall to the bottom of the tank, where they can be later captured for use as a by-product. Over the course of 1-2 weeks, the copper ions plate onto the cathode, resulting in a 300-pound sheet of 99.9% pure copper.
Worksheet and Glossary
The Copper Electrolysis Hands-On Instructional Guide can also be downloaded as a PDF, and contains additional images, a worksheet and answer guide, and a glossary. A supporting PowerPoint presentation can also be downloaded. Return to the Copper Module homepage to access downloads.